使用react-router跑通基本路由
下载react-router和history
$ npm install react-router history --save
简单说一下react-router和history分别是什么:
- react-router is a complete routing library for React. react-router是一个专为react提供的完整路由库。
- history is a JavaScript library that lets you easily manage session history anywhere JavaScript runs. history是一个js库,可以让您轻松地管理会话历史。
接下来我们开始写代码:
代码清单:app/index.js
import React from 'react';
import ReactDOM from 'react-dom';
import { Router, browserHistory  } from 'react-router';
import routes from './routes/index.jsx';

let root = document.getElementById('app');
ReactDOM.render(
  <Router routes={routes} history={browserHistory} />, root
);
这里我们引入了react-router里面的Router,为了方便路由管理,我们新建一个管理路由的目录,并且引入路由配置,接下来在app目录下创建一个路由表。
代码清单:
$ cd app && mkdir routes
$ cd routes && touch index.jsx
配置路由,代码清单:app/routes/index.jsx
import React from 'react';
import { Route, IndexRoute } from 'react-router';
import { App, Home, About } from '../containers';

export default (
  <Route path="/" component={App}>
    <IndexRoute component={Home} />
    <Route path="about" component={About} />
  </Route>
)
这里从react-router引入了Route和IndexRoute,其中Route就是用来配置单个具体的路由,IndexRoute是用于在路由中展示默认的组件,而且一级路由中还可以嵌套二级路由。
从container中引入了App和Home这两个容器组件,当访问路由"/"的时候,渲染的是组件App和Home组成的页面。
接下来对App.jsx修改,代码清单:app/containers/App/App.jsx
import React, { Component } from 'react';
import './App.css';
class App extends Component {
constructor(props) {
super(props);
}
render() {
return (
<div>
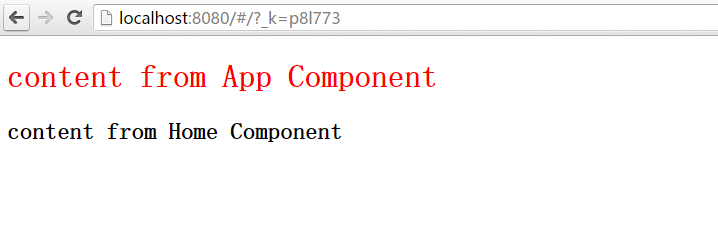
<h1> content from App Component </h1>
{this.props.children}
</div>
);
}
}
export default App;
同时,新增一个容器组件Home。
$ cd app/containers && mkdir Home About
$ cd Home && touch Home.jsx
$ cd ../About && touch About.jsx
代码清单:app/containers/Home/Home.jsx
import React, { Component } from 'react';

class Home extends Component {
  render() {
    return (
      <h2>content from Home Component</h2>
    );
  }
}

export default Home;
代码清单:app/containers/Home/Home.jsx
import React, { Component } from 'react';

class About extends Component {
  render() {
    return (
      <h2>content from About Component</h2>
    );
  }
}

export default About;
这里我们新增了组件,同时在containers下面的组件索引文件中进行更新。
代码清单:app/containers/index.js
'use strict';

export App from './App/App.jsx';
export Home from './Home/Home.jsx';
export About from './About/About.jsx';
初步完成路由的管理,我们先在命令行窗口停止服务,需要修改package.json文件,在启动webpack-dev-server的时候加上参数--history-api-fallback
因为我们这里用的是browserHistory,启动服务的时候加上history-api-fallback用于
enables support for history API fallback.
好了,重新运行npm run dev,我们接下来在浏览器中查看效果.